Next.js static export images: the default loader breaks them and unoptimized ships the original
On this page
We built a page with five photographs in a Next.js 16.4.3 App Router app, set output: 'export', left the image settings alone, and next build finished with exit code 0. In Chrome none of the five images loaded: every src pointed at /_next/image, an endpoint a static export doesn't contain. Setting images: { unoptimized: true } fixes that, and the export then serves the file you put in public/. Chrome at phone size downloaded 2.4 MB for five 1800 px photographs, and 55.2 MB when the same page held five 4K Gemini JPEGs.
This post compares that flag, next-image-export-optimizer and resizing the files first by what Chrome downloaded at phone size and at desktop size. The table is in the second section, and the choice we'd make follows the three options.
The App Router build passes and the images 404
Next's error page says the default loader "relies on the Image Optimization API which is not available for exported applications", and its static export guide lists "Image Optimization with the default loader" as unsupported. So we ran both commands in 16.4.3. next dev answered HTTP 500 with the error text, and a Pages Router build with one image exited 1 with a similar message. Our App Router next build exited 0 after 3 seconds and printed no warning. out/index.html mentioned /_next/image 53 times and out/ had no folder for it, so our static server answered 404, and in Chrome all five images had a naturalWidth of 0.
To catch it before you deploy, search the HTML in out/:
grep -rl --include='*.html' '/_next/image' out
It printed out/index.html for the default loader and nothing for the unoptimized, optimizer and full-size Smart exports. Without --include, all four also matched a JavaScript chunk. It exits 0 when it finds a match, so a CI step wants a ! in front.
basePath is a second way to get 404s. With basePath: '/site' and unoptimized, the exported tag kept src="/images/landscape.jpg". Served under /site/, that address returned 404 and /site/images/landscape.jpg returned 200. Next's basePath docs say you add the prefix to src yourself.
unoptimized ships the file as it is and drops srcset
The setting the error page lists goes in next.config.mjs:
// next.config.mjs
export default {
  output: 'export',
  images: { unoptimized: true },
}
The image docs call the result "served as-is". Our out/images/ held the sources byte for byte (SHA-256 matched on all ten files), and the exported HTML had no srcset and no sizes attribute, although the page sets sizes. Every screen gets the one file.
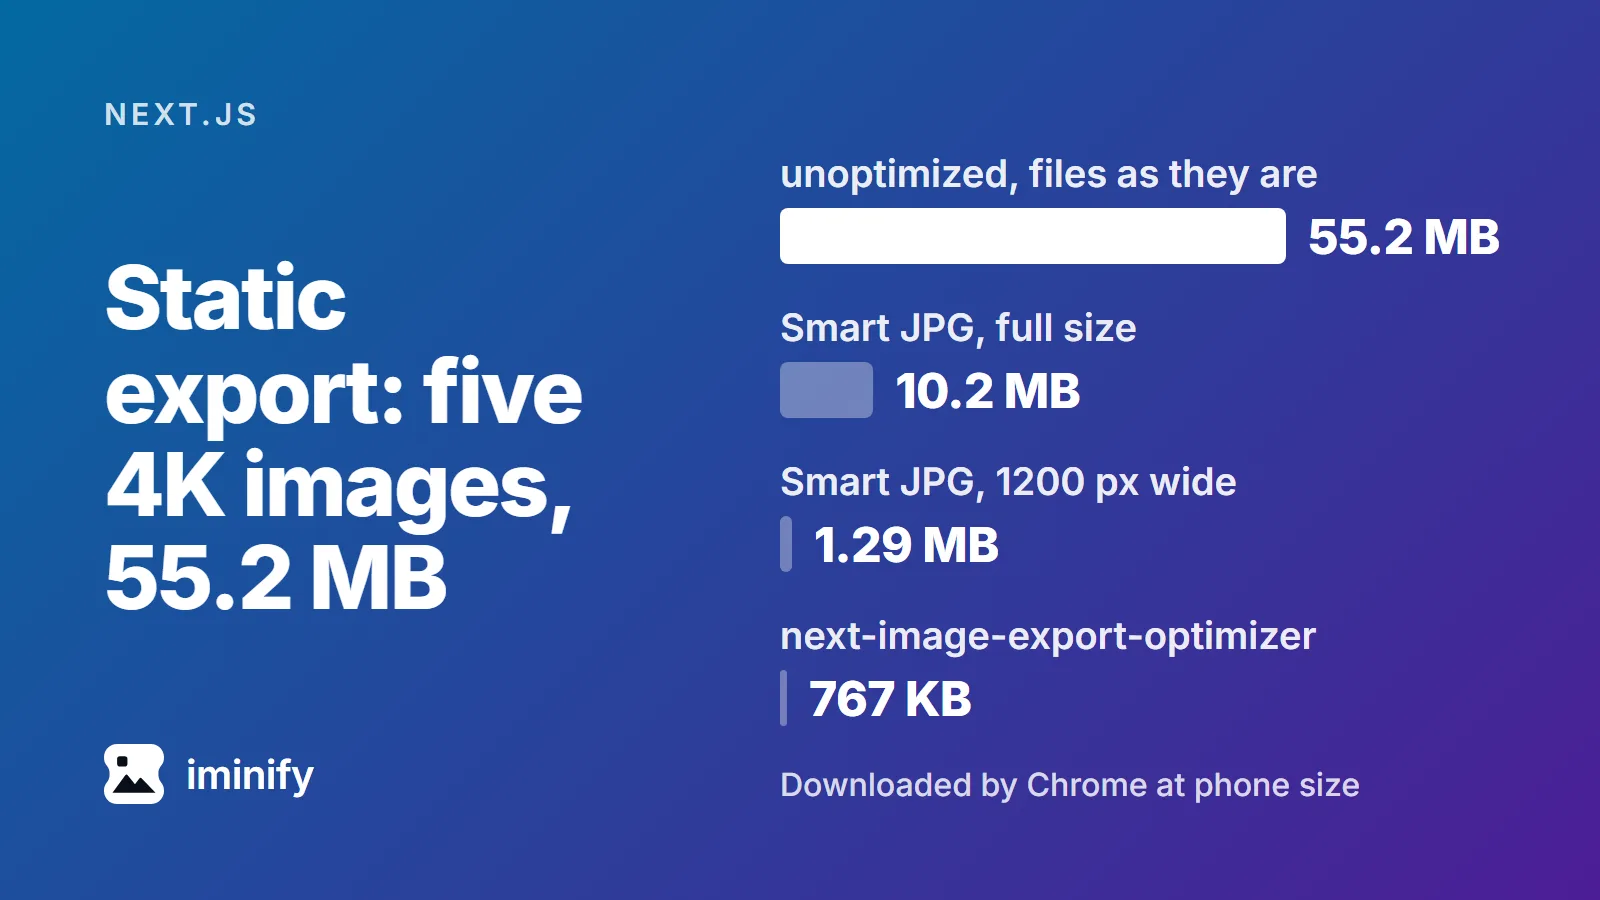
The table is what Chrome downloaded for the same page in four setups, once with the five 1800 px photographs of our first post and once with five 4K Gemini JPEGs of 5504 by 3072 pixels. Smart is Iminify's default compression level, a higher score means closer to the original, and the last row is the optimizer described below:
| Setup | Photographs, phone / desktop | 4K JPEGs, phone / desktop | Score, photographs / 4K |
|---|---|---|---|
unoptimized, files as they are |
2.40 MB / 2.40 MB | 55.2 MB / 55.2 MB | 100 / 100 |
unoptimized, Smart JPG at full size |
1.09 MB / 1.09 MB | 10.2 MB / 10.2 MB | 77.1 / 83.0 |
unoptimized, Smart JPG 1200 px wide |
580 KB / 580 KB | 1.29 MB / 1.29 MB | 80.8 / 79.1 |
| next-image-export-optimizer, WebP 75 | 315 KB / 180 KB | 767 KB / 221 KB | 68.0 / 73.2 |
Phone means 390 px wide at 3x and desktop 1440 px at 1x, both scrolled to the end. Scores are the median SSIMULACRA 2 of the five delivered files against the master at the delivered size, so 100 is the master itself. For the optimizer, the scores are of the 1200 px files the phone received.
The first row is 72 times what the optimizer sent the phone for the 4K files, and about 250 times what it sent the desktop.
next-image-export-optimizer gives a phone one file and a desktop another
next-image-export-optimizer had 58,022 npm downloads in the week to 29 October 2026, and we ran version 1.21.2. It runs after next build and writes each image at every width in your imageSizes and deviceSizes. This is its README configuration, written as a next.config.mjs:
// next.config.mjs
export default {
  output: 'export',
  images: {
    loader: 'custom',
    imageSizes: [16, 32, 48, 64, 96, 128, 256, 384],
    deviceSizes: [640, 750, 828, 1080, 1200, 1920, 2048, 3840],
  },
  transpilePackages: ['next-image-export-optimizer'],
  env: {
    nextImageExportOptimizer_imageFolderPath: 'public/images',
    nextImageExportOptimizer_exportFolderPath: 'out',
    nextImageExportOptimizer_quality: '75',
    nextImageExportOptimizer_storePicturesInWEBP: 'true',
    nextImageExportOptimizer_exportFolderName: 'nextImageExportOptimizer',
    nextImageExportOptimizer_generateAndUseBlurImages: 'true',
    nextImageExportOptimizer_remoteImageCacheTTL: '0',
  },
}
Install it with npm install next-image-export-optimizer, make the build script next build && next-image-export-optimizer, and import ExportedImage from the package where the page used Image. For each image it writes a -opt-<width>.WEBP file at 17 widths: the 8 in imageSizes, the 8 in deviceSizes and a 10 px placeholder, 85 files for our five images. The <img> gets a srcset: the phone took the 1200 px file for all five images, and the desktop took 1200 px for the hero and 384 px for each card.
In our test its WebP at quality 75 was the one next/image makes: the 1080 px and full-size files for the five photographs were SHA-256 identical to what our self-hosted Next.js 16.4.3 returned for q=75 on 1 November, 10 of 10 (post 26 covers that pipeline). The WebP scored 68.0 at the median on the 1200 px photographs, below the 70 that the scale calls high quality.
It costs files and disk. out/ kept the originals beside the 85 new files, so the export of the photographs grew from 3.04 MB to 6.05 MB and the 4K export from 55.8 MB to 65.7 MB. From a clean public/images, the optimizer took 3 to 4 seconds on each of three builds for the photographs and 15 to 20 seconds for the 4K files.
Quality is one global number. At quality 85 the phone downloaded 495 KB of photographs at a score of 77.3, and 1.08 MB of 4K files at 80.4. Smart at 1200 px sent 580 KB at 80.8 and 1.29 MB at 79.1, so on the photographs the optimizer was smaller and scored lower, and on the 4K files it was smaller and scored higher.
Resizing first gives every screen the same file
The other road keeps unoptimized: true and sends files that are already the displayed size. Any tool that resizes and compresses does this step. We used Iminify, our compressor, through its API: level smart, format jpg, width 1200. The compress JPEG page has the same Smart level and a width setting under Size, for a batch dropped in the browser.
unoptimized leaves the <img> without a srcset, so one file serves both screens, and a 1200 px hero on a 2x desktop would be drawn at half the display's density. Iminify's Pro plan can also write a responsive set with a srcset snippet, which we didn't test.
What we'd pick
One width for every screen: resize and compress before the build, and keep unoptimized: true. It adds nothing to next build.
Different widths on different screens, as with the hero and cards of our test page: next-image-export-optimizer, with a quality you choose and a deploy folder that also holds the originals.
Either way, don't deploy 4K originals under unoptimized.
How we measured
One page, built in Docker with Next.js 16.4.3 (Turbopack, App Router), React 19.3.1 and sharp 0.35.5: a hero up to 1200 px wide and four cards, sizes set, lazy loading left on. Chrome 156 was driven through DevTools at 390 by 844 at 3x and 1440 by 900 at 1x from a local static server with caching off, scrolled to the bottom. Each currentSrc was mapped to its file's bytes in out/, so the figures are file bytes, with KB and MB at 1,000 and 1,000,000 bytes; post 1 lists its photographs in 1,024-byte KB. The optimizer's pages were loaded twice and picked the same files.
We ran 15 of the 20 Smart uploads twice, and every pair of outputs was byte for byte identical. The 4K files are 16.9 megapixels, and Smart's SSIMULACRA 2 check stops at 8 megapixels, so Smart held them to its PSNR floor alone at full size. Scores are SSIMULACRA 2 (libjxl 0.12.0) after decoding with djpeg and dwebp, against the master resized by sharp for the resized files. The optimizer resizes with sharp too, so its scores leave out the difference between Iminify's resize and sharp's, which the Smart 1200 px scores include. The 4K files come from our September Gemini sample set (Nano Banana 2 and Pro): four are among the 52 files post 15 measured, and the fifth is a Nano Banana 2 file from the same set, made through generateContent. Google's image page now lists Nano Banana 2.1 as the current model, which we did not use.
We did not test a CDN loader, which the Next.js guide uses for its own image example, or AVIF, Firefox, Safari or a 2x desktop.